React Redux
Back to home
- React Redux
- Why use React Redux?
- Redux Architecture
- Counter App using Redux
𝑻𝒂𝒃𝒍𝒆 𝒐𝒇 𝑪𝒐𝒏𝒕𝒆𝒏𝒕
React Redux
As your state becomes more complicated in React projects, a state management tool becomes necessary; one such option is Redux. The Store in Redux allows you to manage your whole application's state in a single object.
Redux is a stand-alone library that works with any UI layer or framework, including React, Angular, Vue, Ember, and plain JS. Although Redux and React are frequently used together, they are not mutually exclusive.
If you're using Redux with a UI framework, rather than directly communicating with the store from your UI code, you'll most likely require a"UI binding" library to connect Redux to your UI framework.
Why use React Redux?
The official UI bindings for react applications are React Redux. It's kept up-to-date with any API updates to ensure that your React components work as they should.
It promotes the use of 'React' architecture.
Many performance optimizations are implemented internally, allowing components to re-render only when necessary.
Redux Architecture
Before diving into the code, it's a good idea to consider how Redux works theoretically. The steps in Redux's approach are depicted in the diagram below:
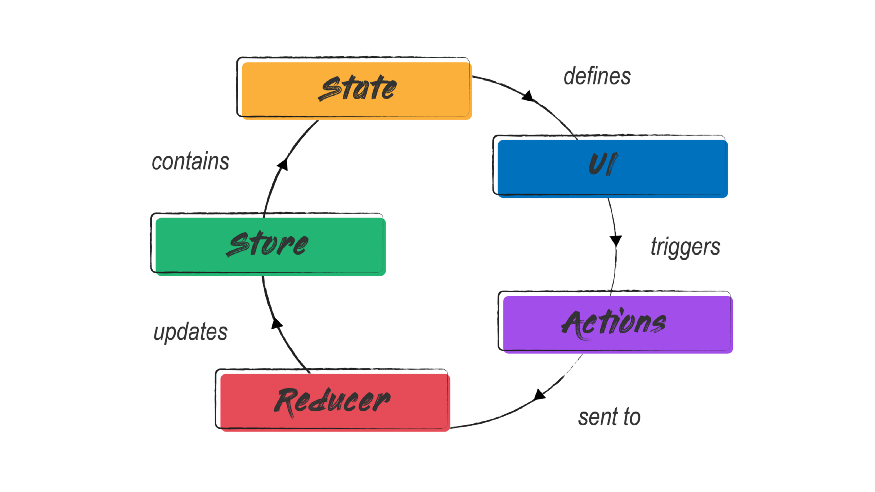
Let's see one by one
Store
A Store is a location where you may see the current state of your application. It has a dispatch(action) method and handles the application's status. In Redux, it's like a brain that controls all of the moving pieces.
Action
An action is a simple object that denotes a desire to change the current state. They must have a property that specifies the sort of action that will be performed.
⮞ Actions are information payloads that transfer data from your app to your store.
⮞ Any data, whether via UI events or network callbacks, must be transmitted as actions at some point.
⮞ A type field must be present in all actions, specifying the sort of action being executed.
Reducers
Reducers are pure functions that specify how the state of the application changes as a result of actions passed to the store.
⮞ Actions merely explain what occurred; they do not indicate how the application's state changes.
⮞ A reducer is a function that takes the current state and action and returns a new state that includes the action.
Redux Installation
Install the following command to utilise React Redux with a React application.
$ npm install redux react-redux --save
Counter App using Redux
We'll make a basic counter app that increments and decrements the current state. An integer will be used to represent the state.
Import Redux NPM packages
npm install redux react-redux
Reducer Creation
A reducer is a simple function with only two inputs: state and action. Anything, including objects, can be considered a state. Action is a string-based object having a type attribute that specifies the action type. In src/index.js, let's make a countReducer.
const countReducer = function (state = 0, action) {
  switch (action.type) {
    case "INCREMENT":
      return state + 1;
    case "DECREMENT":
      return state - 1;
    default:
      return state;
  }
};
Redux Store Creation
The state is stored in the store as a single large global object called a state tree. We can do the following with the help of the store:
dispatch: modify the state
subscribe: recieve the status of changes
retrieve the entire state tree
import { createStore } from 'redux';
...
let store = createStore(countReducer);
Now we'll use the NPM module react-redux to connect redux and react.
import { Provider } from 'react-redux';
...
const App = () => (
  <Provider store={store}>
    <h1>Helloworld React & Redux!</h1>
  </Provider>
);
ReactDOM.render(<App />, document.getElementById('root'));
Connect a Container Component
import { Provider, connect } from 'react-redux';
...
const Component = () => <h1>Helloworld React & Redux!</h1>;

const Container = connect()(Component);

const App = () => (
  <Provider store={store}>
    <Container />
  </Provider>
);
Transform State from Redux Store
Let's select the state and, if desired, alter it using our Container component.
const mapStateToProps = state => {
  return {
    count: state
  };
};
const Container = connect(mapStateToProps)(Component);
Add Buttons
const Component = ({count, handleIncrementClick, handleDecrementClick}) => (
  <div>
    <h1>Helloworld React & Redux! {count}</h1>
    <button onClick={handleDecrementClick}>Decrement</button>
    <button onClick={handleIncrementClick}>Increment</button>
  </div>
);
Pass Callback
It's time to link our callback routines to our store dispatch. Here's how things have changed:
const mapDispatchToProps = dispatch => {
  return {
    handleIncrementClick: () => dispatch({ type: 'INCREMENT' }),
    handleDecrementClick: () => dispatch({type: 'DECREMENT'})
  }
};
const Container = connect(mapStateToProps, mapDispatchToProps)(Component);
Output:
Conclusion: So there you have it, your journey into the React realm. We've started with Redux in React to get you familiar with why you'd use in React and what you can do with it.